VU Meter – Setting 0 VU
As VU calibration can be a intimidating thing for the novice let’s just concentrate on the basics you will need to calibrate your equipment’s VU meters and leave all the dBm, dBu, dBv, -10, +4 stuff for another article.
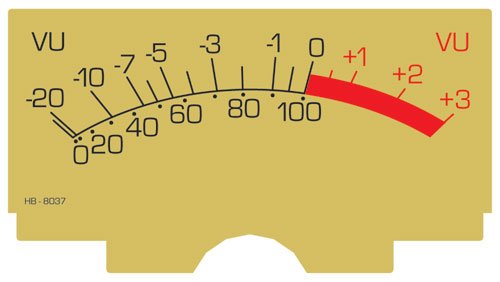
A VU meter is basically a analog AC voltmeter that measures AC voltage. The VU Meter was born back in 1939 when Bell Labs, broadcasters CBS and NBC got together to come up with a way to measure the amount of audio (AC voltage) being sent down telephone lines. The VU meter they developed is still in use today. A typical VU meter has a scale starting at -20 VU and ending at +3 VU with everything above 0 VU being in Red print. (see picture below ) It is unlike any other AC voltage meter in that it’s needle has a specific rise and fall time of 300 milliseconds. Which means if you apply a 1kHz sine wave at 0 VU level (more about this later) it will take 300 mS for the needle to reach 0 VU on the scale, and when you remove the tone it will take 300 mS for the needle to drop back to -20 VU on the scale. This slow (300 mS is slow?) rise and fall time give the VU meter it’s characteristic average response to the audio signal.
+4dBu = 0 VU…
All VU meters must be calibrated in order for them to tell us any useful information when looking at them. The 0 VU mark is a reference point for this. Theoretically you could make 0 VU any level you wish but audio professionals have come up with a set of standards for 0 VU. The most common is +4 dBu. So to calibrate the meter we would put a 1kHz sine wave at +4 dBu which is 1.228 Volts RMS into the device the meter is measuring and turn the meter calibration adjustment until the needle reads exactly 0 VU. Now with the meter calibrated you are able to read audio levels in dBu. For example if the needle is bouncing at -5 VU you would know you have a -1dBu signal going present. (+4dBu reference minus 5 VU = -1dBu) And if it pegging at +3 VU you would know your level is above +7dBu. (+4dBu reference plus 3 VU = +7dBu)
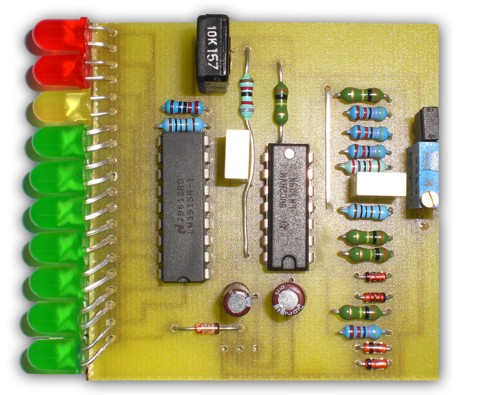
LED Bargraph…
That was simple right? But you say your VU meter is a LED bargraph. (see below) Well in this case the yellow or amber LED is the 0 VU mark so you inject the same 1kHz/+4 dBu signal and then adjust the meter so the amber LED just turns on. The best way to do this is to turn the adjustment screw a few times so you go above and below this point and then just turn it very slowly so that the amber LED just lights up. Always set it so the amber LED just turns ON rather than just turns OFF.
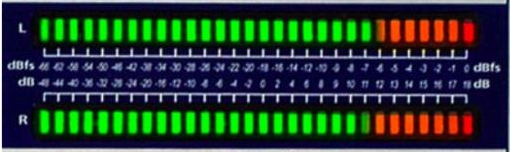
plus 4 equals minus 18…, what the hell does that mean?
Ahhh… but of course you are using some sort of digital media and the top most scale on your meter is 0. (see below) Well this is called 0 dBfs, or 0 db full scale because it is the end limit of the digital system. Anything above it would cause digital distortion. Now not all digital systems are the same so some clip at +20 dBu, while others go to +22 dBu and even +24 dBu. So taking a typical digital system with a maximum capability of +22 dBu which would be 0 dBfs, you subtract your +4 dBu reference to give you 18 dB, and then adjust your meter putting a 1kHz sine wave at +4 dBu like we did above but now to -18 dBfs. Get it? +4 dBu is now -18 dBfs on your meter. So if the digital meter has a VU response (most do not) you keep your levels at around -18 dBfs giving you 18 dB more for peaks. However most digital meters are PPM or Peak Program Meters so you can run your levels all the way up to the top as long as they don’t exceed 0 dBfs.
So now as you can see the VU is not just a lot of bouncing needles and flashing lights to impress the punters with. After calibration it is a useful tool to help you understand just where your are audio levels are at. This in turn will help you obtain maximum signal to noise without distortion from your system.